Tutorial on collaboration with ArgoUML
![]()
|
1. Introduction
The objective of this tutorial is to explain how to install, configure and execute ArgoUML to enable a collaborative session that allows the edition of UML diagrams. The main steps to download, install and configure are described on the following sessions. 2. Download and Install The environment that ArgoUMl will be run must be configured before the download of the modified version of the ArgoUML. This configuration is required by the Java Runtime Platform (JRE). The Java can be downloaded from Sun Microsystems web site. For testing pourposed we recomended the version 1.4 or superior of the JDK (Java Development Kit) of the J2EE (Java 2 Enterprise Edition). The link to download the JDK 1.4 of the J2EE is: http://java.sun.com/j2ee/1.4/download-sdk.html It is recommend that the user read the readme.txt file that cames with the instalation package. After the installation of the JDK, the user must configure the environment varible CLASS_PATH and insert the correct path of the executable files on the PATH variable. The JDK documentation contains all the informations showing how these configurations must be done. The next step is download the files of the original ArgoUML. The compressed file that contais all the required files and libraries is based on the version 0.18.1 and it's name is ArgoUML0.18.1.zip. This files has the size of 8.7 MB and can be downloaded from this link. After the download of the compressed file, extract all the archives to a separeted folder, i. e. c:\ArgoUML. To test the original ArgoUML go to the folder c:\ArgoUML and execute the following line: c:\ArgoUML\java –jar argouml.jar The welcome screen of ArgoUML must be presented if there are no configuration errors on the environment. For more information on the instalation of ArgoUML please check the readme.txt file that are inside the folder that contains all the extracted archives. To run the modified version of ArgoUML that allows collaboration one must download the following archives: a) ArgoCollab.zip (2,7 MB). This compressed file contains the archives: argouml.jar - This .jar file contains the modified version of ArgoUML 0.16.1 that allows collaboration. gef.jar - This .jar file contains the modified version of GEF 0.10.4 that allows collaboration. After download the ArgoCollab.zip file, extract the argouml.jar and gef.jar archives to a common folder. Make a copy of this two files to the foilder that the original ArgoUML was extracted (c:\ArgoUML) replacing the two original files. To download the ArgoCollab.zip file click on this link. b) IdeiaServer.zip (11 KB). The file IdeiaServer.zip contais the Collaboration Server called IdeiaServer. The following archives are compacted inside the IdeiaServer.zip file: IdeiaServer.class – This file contains the Bytecode of the IdeiaServer class. IdeiaServer.java – Source code of the Collaboration Server. IdeiaServerT.class – This file contains the Bytecode of the IdeiaServerT class. Extract the files of the IdeiaServer.zip on a different folder, i. e. c:\Server. To download the IdeaServer.zip file click on this link. 3. Running the Server To run the Collaboratoin Server, which can be on a different computer than the modified ArgoUML, go to the folder where the IdeiaServer.zip files was extracted and then execute the following line: c:\servidor\java IdeiaServer {number} Where {number} is the TCP/IP port number that will be used for the network communication between the clients and the server. The port number must be open on the server to receive and send data If there is any firewall that blocks the communiction on the port. Please choose a port number that is not used by the operating system or by any other applications. The Figure 1 shows the exection of Collaboration Server running on the port 123 . 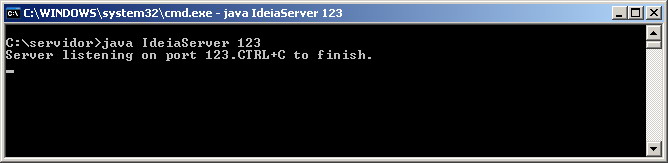 Figure 1. Collaboration Server running on the port 123. 4. Running the ArgoUML The modified ArgoUML was based on the version 0.16.1 of the original ArgoUML. However, the modifications do not change the main functionalities of the tool. To run the modified version of the ArgoUML go to the folder where the modified ArgoUML files were copied and then execute the following line: c:\ArgoUML\java -jar argouml.jar The line above will show the welcome screen of the ArgoUML, showed on Figure 2.  Figure 2. Welcome screen of the modified ArgoUML. After the applications finalize their intial processing the GUI is presented. Some graphic elements were included to the original GUI (Graphical User Interface) to allows shared awareness to the users. Figure 3 shows the GUI of the modifed Argouml with the new awareness devices 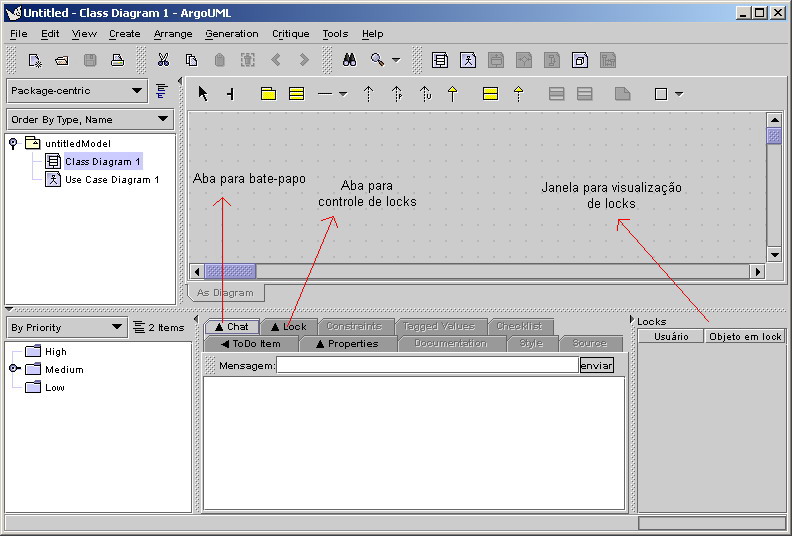 Figure 3. GUI of the modified ArgoUML. 5. Collaborative Session To start or join a collaborative session, go to the menu Tools and then choose the new option "Colaboraçăo". The windows that configures the connection with the Collaboration Server is presented and the user must enter the I.P. address of the server, the comunication port that the server is using, and a user and a password. Only two users are allowed to log in on the collaboration server: User:A Password:A User:B Password:B With this two user the collaboration can made only by pars. Figure 4 shows and example of the connection windows with the data of a fictitious user called mauro 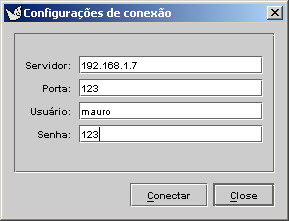 Figure 4. Configuration window. After the establishment of the connection with the Collaboration Server, a new window is presented to the user. On this window the user must choose to create a new collaborative session or to join an existing one. Figure 5. shows the creation of a new collaborative session called sc1. 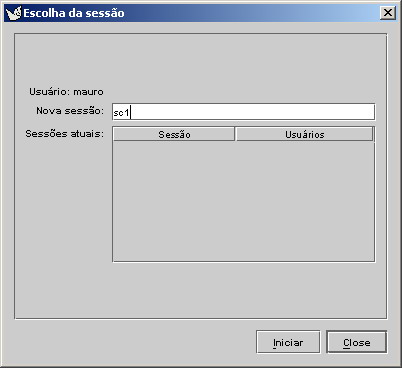 Figure 5. Creating the new collaborative session sc1. Cliking on the "Iniciar" button the user create a new collaborative session called sc1 based on the diagram that the user is currentily positioned. After the creation of the sc1 session others uses can join and participates on the collaborative modelling session. To test the collaborative edition on ArgoUML other ArgoUML instance must be open. On this other instance the fictitious user hirata connects to the collaboration server and choose to join the existing sc1 session, showed by Figure 6. The user then choose the sc1 session by clicking on the row of the grid and pressing the "Iniciar" button. 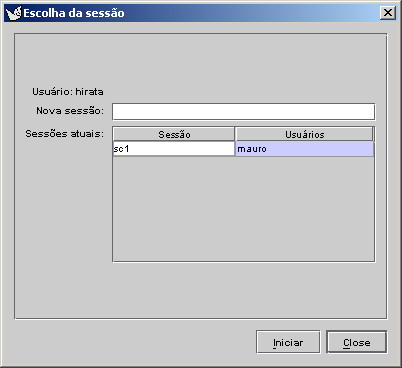 Figura 6. Chousing the collaborative session sc1. After user hirata connects to the server both user of the are participating on the same collaborative session. The user hirata see the telepointer representing the user mauro with a black cross, as figure 7 shows. The user mauro see the telepointer of the user hirata represented by a blue cross, as figure 8 shows Ager the creation or selection of any element on the diagram a lock request is fowarded to the collaboration server, which evaluates if the lock can be granted or not. On the Figure 7 we can see that the user hirata was the lock on a class and the user mauro has the lock on a interface. These lock informations are showed by a window that present all the current locks and it's owner. This lock windows is localized on the right side of the GUI. The user can communicate with each other by the means of a chat tool. Each user writes messagens on the "Mensagem" field the then clicks on the button "enviar" to send the messagem to the others users on the same collaborative session. 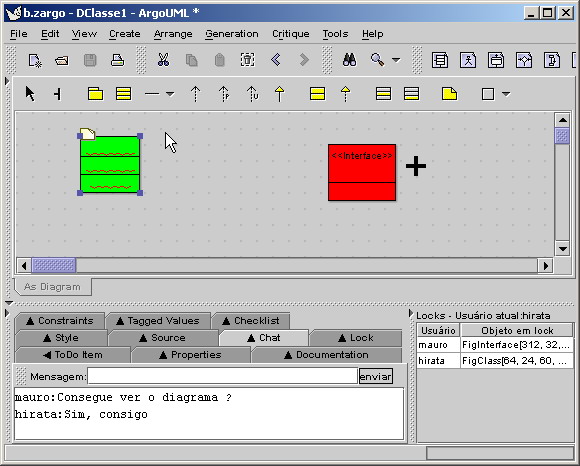 Figure 7. ArgoUML of the user hirata. 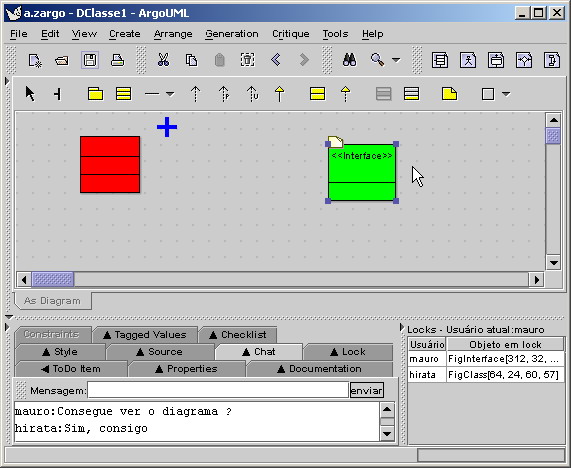 Figure 8. ArgoUML of the user mauro. |
